Knitting Tutorial: How to Knit Judy's Magic Cast-On
I was a late bloomer in the world of sock-knitting. Frankly, I just didn't see the appeal - there are far more interesting things to be knitting than socks. Or so I thought.
I knitted my first sock project less a year ago. They were a pair of Bayerische Socks that were, in hindsight, a very optimistic project for my first pair of socks. Thankfully, they came out perfectly and kick-started my love for knitting socks - perhaps the most wearable of basics?
It was through my sock-knitting adventure that I discovered Judy's Magic Cast-On: an invisible cast-on for toe-up socks that is, indeed, magic.
Easy Cast-On for Toe-Up Socks
This cast-on was first devised by Judy Becker and shared in her article on Knitty in 2006. It's extremely clever as not only is it invisible on both sides of the fabric, but it is also incredibly quick and easy! This is truly a dream of a cast-on.
As she shares in her own article, this cast-on is not just reserved for socks; it can be used for anything where you are knitting in the round and need a neat, seamless edge.
I've been using it most recently for a t-shirt design I am working on, which I want to have very simple, minimalist trims. Because the hem is split, I wanted to knit them circularly in stockinette before joining at the top, so that the edges of the splits are closed and super neat. This cast-on was ideal for the job.
In today's knitting tutorial, I will teach you:
How to knit Judy's Magic Cast-On
How to knit the first row after the magic cast-on
It's super quick and easy, so you must give it a try!
Judy's Magic Cast-On Tutorial
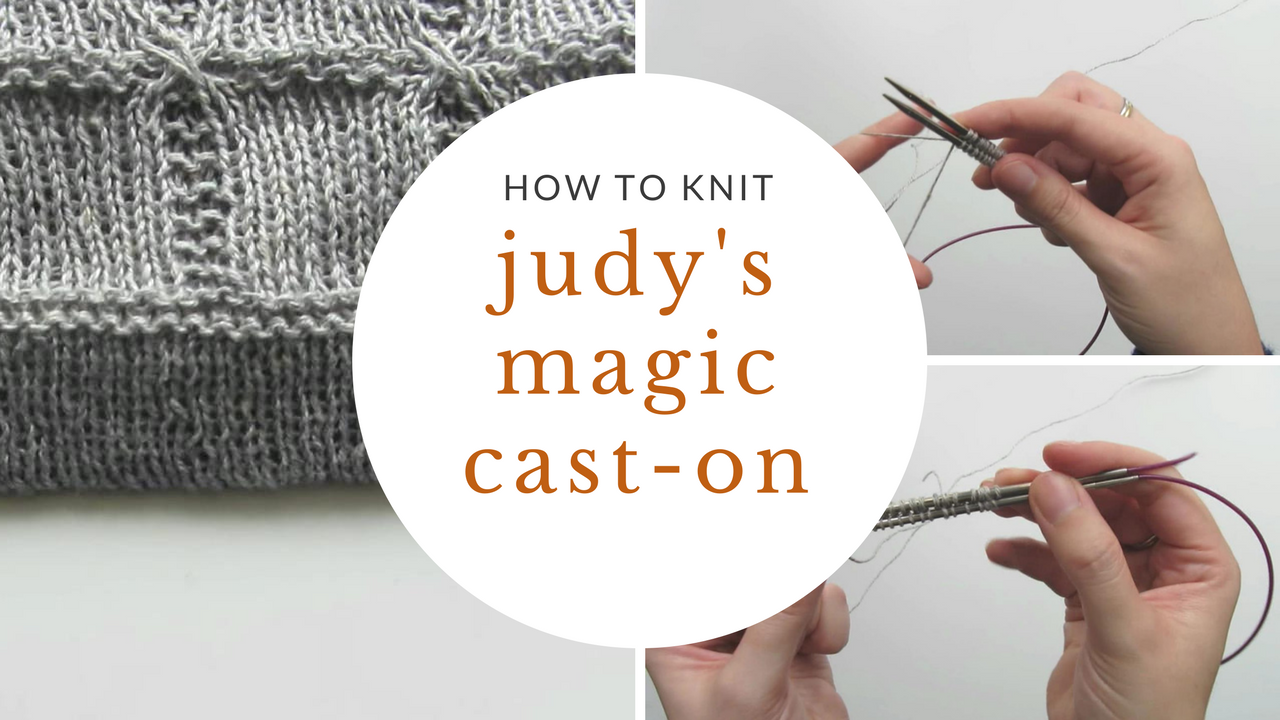
Written Instructions on How to Knit Judy's Magic Cast-On
Create a slipknot leaving a tail end of 3-4 times the width of the intended cast-on.
Using circular needles with a long-ish, flexible cable, hold both ends of the needle in your right hand, one in front of the other.
Slip your slipknot onto the back needle with the tail end at the back on the needle and tighten up.
Grab both ends of yarn in your left fist, and then separate using your pointer finger and thumb. The tail end should be over your pointer finger and the working end should be over your thumb.
Keeping your left hand static and moving both needles in your right hand only, move the tip of the front needle over and under the tail end of yarn. The yarn should wrap around the front needle and finish up in between the two needles.
Then, move the tip of the back needle over and under the working end of yarn. The yarn should wrap around the back needle and finish up between the two needles.
Repeat steps 5 and 6 until you have the desired number of stitches on the front and back needles.
Flip the needles upside down so that you can see the purl bumps and then, using the magic loop technique, pull out the back needle to knit into all of the stitches on the front needle.
Turn your work and do the same thing, but this time, knit through the back of the loop on all of the stitches as they are twisted on this needle.
You are now ready to knit in the round, using the magic loop, for as long as you want.
Ready to go beyond following patterns?
I made a free video to show you how to turn your knitting pattern ideas into a proper design plan, even if you’ve never tried designing before.
It walks you through the first three steps in any design process: finding inspiration, sketching your idea, and swatching with purpose.