How to Grade Knitting Patterns: Calculating Stitch & Row Counts for All Sizes
When I surveyed our community on what they struggle with most when it comes to designing knitting patterns, grading was, by far, the most common difficulty - so if you’re finding it hard too, you are not alone!
Imagine if you could grade your knitting patterns, including stitch and row counts, into several sizes without needing to do the math yourself. All it takes is drag and drop. That’s essentially what a grading spreadsheet can do for you.
Start Here
In my previous blog post in this series, I covered how to set up your grading spreadsheet, fill out the body measurements and use them to calculate your desired finished garment measurements. If you haven’t yet read this article, I suggest you read that one first because this blog post is based on the foundations of that one.
How to Calculate the Stitch & Row Counts in Your Knitting Pattern Across All Sizes
Today, I will show you how to use your finished garment measurements and your gauge to calculate the stitch and row counts required for your pattern, as well as how to tackle simple shaping.
Add this graphic to Pinterest to save this article for later!
You Will Need:
A grading spreadsheet with completed body measurements, ease, garment measurements and gauge
An understanding of how you want to construct your garment
A cup of tea! This is a big guide, so tea (and biscuits, ideally) are essential.
In my example, I will be making calculations for the front of a basic stockinette pullover that will be knitted flat and seamed. This might differ from the construction or garment style that you wish to create using your spreadsheet, but the same principles can be applied to alternative constructions and garments. This is just an example to help me walk you through those principles. Let’s go!
ribbed trim
We will start with the hem of the front, which is designed in 2x2 rib. This is a simple sweater with no waist shaping, so the cast-on matches the bust width.
Calculating your Cast-On
The cast-on is calculated by multiplying the bust width by the stitch gauge and rounding it to the nearest multiple of 4. We round it to 4 because the trim will be a 2x2 rib, which has a stitch repeat of 4. Then, we add 2 selvedge stitches because this is a seamed garment. You can ask your spreadsheet to calculate this for you by using this formula:
=MROUND(bust width*stitch gauge,4)+2
Place this formula in the appropriate cell for the first size and replace the words bust width and stitch gauge with the appropriate cell references in the spreadsheet. For example, the formula for my first size’s cell is =MROUND(B18*B31,4)+2. B18 is referring to that size’s bust width and B31 is the stitch gauge.
Once you have completed the formula for the first size, drag it across the other sizes and the spreadsheet will automatically fill in the other cells. If you’re not sure how to do this, I show you in my article How to Grade Knitting Patterns Using a Spreadsheet.
Figuring out the number of Rows in your Ribbed Trim
Now, we will work out how many rows to work in the ribbed trim. The first thing we need to do is decide on how deep we want our trim to be, then calculate the number of rows by multiplying that measurement by the row gauge.
For the first size, fill out the length of the trim in cm first, then use this formula to convert the cm into inches:
=MROUND(CONVERT(trim depth in cm,"cm","in"),0.25)
Replace trim depth in cm with the relevant cell reference. This formula is telling the spreadsheet to convert my trim depth in cm into inches and round it to the nearest multiple of 0.25. Side note: I always round my cm to the nearest multiple of 0.5 and my inches to 0.25.
Once your first size’s trim depth is filled out, highlight both the cm and inches cells and copy and paste them across the sizes.
Then, calculate the approximate number of rows needed in the trim using this formula:
=MROUND(trim depth*row gauge,2)
Especially when knitting flat, I use the MROUND function to round my rows to the nearest even number, so that any new actions are started on the right-side of the fabric. Remember to replace trim depth and row gauge with the correct size’s cell references and drag the formula across all the sizes.
Lower Body
This sweater has no waist shaping, so it is knitted straight to the armholes once the ribbing is completed. All we need to calculate here is how long we want the side seams to be and how many rows it will take to get there.
We already have a finished garment measurement for hem to armhole that we filled out previously, so we can reference this cell when saying how long the lower body should be. It’s as easy as using the following formula:
=hem to armhole
Replace hem to armhole with the correct cell reference and drag it across all sizes.
To calculate the number of rows that should be knitted to reach that length, subtract the trim depth from the hem to armhole length and then multiply that measurement by the row gauge. Make sure you round the final figure to the nearest even number. This is the formula you would use to do this in a spreadsheet:
=MROUND((hem to armhole-trim depth)*row gauge,2)
Replace hem to armhole, trim depth and row gauge with the appropriate cell reference, then drag the formula across all sizes.
FREE, ON-DEMAND VIDEO
Feeling Lost in the Numbers?
Armhole Shaping
In this example, I’m creating the kind of armhole you’d need for a set-in sleeve. I will go through this process in some detail now, but I have another blog post lined up which will give you a more thorough guide to designing the armholes and sleeve caps for set-in sleeves. I can’t wait to show you!
Basic Armhole Calculations
We start the armhole calculations by figuring out how many stitches are in the shoulder to shoulder measurement (AKA cross back width), using the following formula:
=MROUND(garment’s shoulder to shoulder*stitch gauge,2)+2
Again, I rounded this number to the nearest multiple of 2 because doing so makes it easier to make the shaping symmetrical. I also added 2 selvedge stitches because they will be used when the sleeve is stitched into the armhole. Drag this formula across all sizes.
Then, we work out how many stitches need to be removed at each side in order to get from the bust width to our shoulder to shoulder width. You can calculate this by subtracting the shoulder to shoulder width in stitches from the bust width in stitches. This will tell us how many stitches need to be removed in total, so divide this number by 2 to find out how many stitches should be decreased per armhole. This can be worked out on the spreadsheet by using this formula:
=(bust width in sts-shoulder to shoulder in sts)/2
Replace bust width in sts and shoulder to shoulder in sts with the appropriate cell references and drag the formula across all of the sizes.
The final basic calculation you will need to make is to figure out how many rows these decreases will be worked over. This is usually over the first 4-7.5cm of the armhole, depending on the size of the garment. Larger sizes will need more rows of armhole shaping whilst smaller sizes will need less.
I start out by estimating the measurement (within the above range) initially and then adjust if the numbers aren’t working out. This is the formula I use:
=MROUND(estimated length of armhole shaping*row gauge,2)
Replace estimated length of armhole shaping with a number between 4-7.5, considering each size’s proportions, and replace row gauge with the appropriate cell reference. We will likely need to go back to this section and make adjustments, but this is a good starting point.
Calculating Initial Armhole Bind-off
The initial bind-off is usually between 1.5-2.5 cm, depending on the size of the garment. You can calculate it using the following formula:
=MROUND(desired width of bind-off in cm*stitch gauge,2)
Replace desired width of bind-off in cm with a number between 1.5-2.5. For smaller sizes, I’m likely to use 1.5 and for larger sizes, I’ll use 2.5. This is because the larger sizes usually have more stitches to decrease in the armhole shaping, so it makes sense to get rid of more at the initial bind-off.
Based on that equation, we can now figure out our new stitch count after the initial bind-offs have been worked. Do this by subtracting two of the initial bind-offs from the bust width in sts. This is the formula:
=bust width in sts-(initial bind-off*2)
Use the appropriate cell references and drag the formula across all of the sizes.
These initial bind-off rows have used up 2 of our armhole shaping rows, so we can now figure out how many we have left by subtracting two from the estimated number of rows we calculated earlier.
=estimated rows of armhole shaping-2
Replace estimated rows of armhole shaping with the correct cell reference and drag the formula across all sizes.
I can also figure out how many stitches I now have left to decrease at each armhole, once I have completed the initial bind-offs, by using the following formula:
=number of sts to decrease at each side-initial bind-off
Armhole Decrease Rate
My method for working this out is honestly a bit of trial and error. I simply adjust the following numbers until they work! There is likely a more efficient method for figuring this out, but this works for me and is easy to understand. If I find a better way of doing this, I shall let you know!
I start by planning to decrease 1 stitch at each armhole on every row for half the remaining rows of armhole shaping (rounded to the nearest even number), e.g. I have 16 rows of armhole shaping left in my size XL, so I plan to decrease 1 stitch at each armhole for 8 rows. This is the formula:
=MROUND(rows remaining in armhole shaping/2,2)
Based on this equation, I work out what my new stitch count would be.
=stitch count after initial bind-offs-(number of rows of decs*2)
After that, I work out how many rows of armhole shaping I have remaining by using this formula:
=armhole rows remaining after initial bind-offs-number of rows of decs
For the remaining armhole rows, I plan to decrease 1 stitch at each armhole every second row. Remember, this is just a starting point for our numbers and we will adjust these to get them to work with our pattern. Use this formula to figure out how many times you will do this:
=remaining armhole rows after first set of decs/2
Based on this equation, I can work out my final stitch count after all the shaping has been worked.
=stitch count after first set of decs-(number of times you will dec every second row*2)
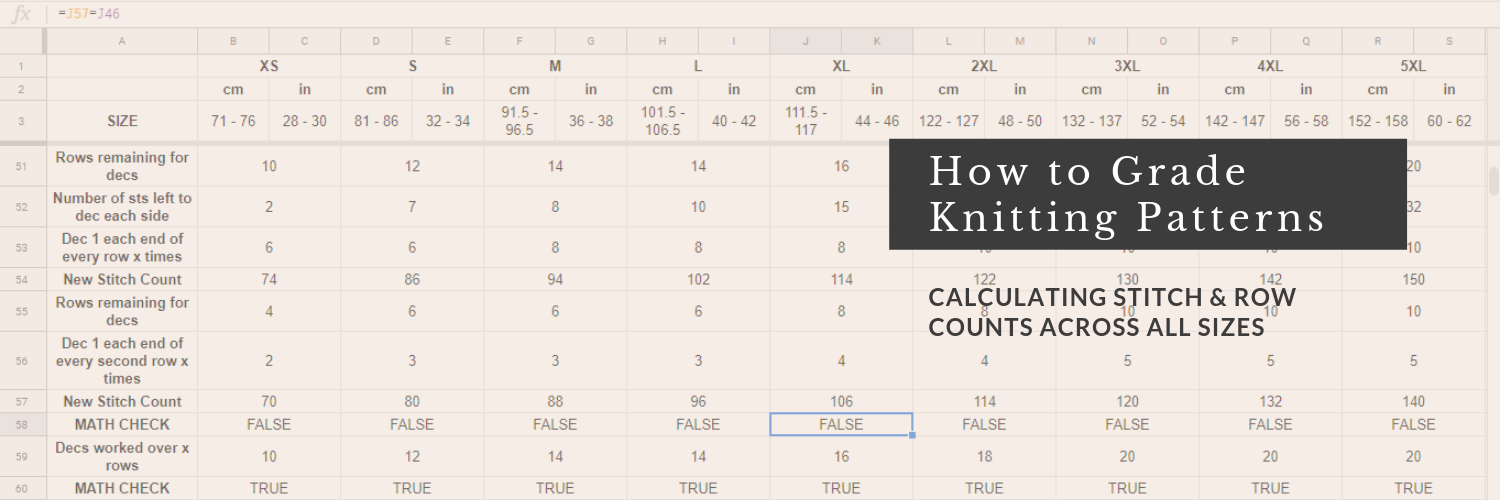
After estimating the rate of armhole decreases, it’s time to check whether the shaping actually works. First, check that you are ending up with your desired final stitch count using the following formula:
=stitch count after second set of decs=shoulder to shoulder in sts
All my initial armhole calculations resulted in FALSE readings, so I had to go back and adjust the numbers
If the cell says TRUE, your armhole shaping results in the stitch count you initially intended. If the cell says FALSE, your armhole shaping results in more or less stitches than you initially intended.
You should do the same check with your row count by using the following formula:
=rows worked in armhole decreases+2 initial bind-off rows=intended number of armhole rows
If you get TRUE readings for both row and stitch count, that size’s armhole shaping is correct and doesn’t need adjusting.
More than likely, you’ll get FALSE readings for almost all of your stitch counts - don’t worry. This is totally normal! All you need to do is go back and adjust the number of rows you work in the first set of decreases. I prefer to use an even number of rows throughout, but will sometimes work an odd number of rows in order to get the correct numbers.
If your final stitch count after armhole shaping is higher than the shoulder to shoulder in sts, try adding more rows to the first set of decreases. If it is lower than the shoulder to shoulder in stitches, try adding fewer rows to the first set of decreases
After adjusting the numbers in my armhole decrease rate, I have now got TRUE readings for all sizes.
You might find that for some sizes, it is impossible to get a true reading for both stitch and row counts. In that case, I tend to skip one of the sets of decreases and adjust the number of rows used in the armhole shaping to reach the correct stitch count. You can always work more or less rows in your armhole shaping than you originally calculated, as long as the overall length of the armhole remains the same.
Remaining Rows in Armhole
Once the armhole shaping is complete, you can work out how many rows to work straight until the shoulder shaping begins. You can do this by working out the finished garment armhole depth in rows, rounded to the nearest even number, and then subtract the number of rows used in the armhole shaping. The remaining rows can be worked straight - although remember that your front neck will likely eat into those rows, so you will need to remember that when writing your final pattern.
=MROUND((finished garment armhole depth*row gauge),2)-rows of armhole shaping
Front Neck Shaping
Now that we have completed our armhole shaping, we can start working out how to shape our neckline. In my example, I’m creating a simple rounded neck.
The first step is to find out how many stitches are needed to create the desired neck width. To find out, I multiply my finished neck width by my stitch gauge and round it up to the nearest multiple of 2. This is the formula that should be used and dragged across all sizes:
=MROUND(neck width*stitch gauge,2)
We also need to find out how many rows will give us our intended neck depth by multiplying the front neck drop from the finished garment measurements by the row gauge and round it to an even number.
=MROUND(front neck drop*row gauge,2)
Neck Bind-Off
For a rounded neck, you will typically bind-off 30-50% of the stitches at the neck. A smaller percentage will give you a narrower neckline whilst a larger percentage will give you a wider neckline.
I want my example’s neckline to be wider looking, so I’m planning on binding off 50% of the neck stitches. This is how I calculate how many stitches to bind-off:
=MROUND(neck width in sts/2,2)
Then, based on this number, I can figure out how many stitches will need to be decreased at each side of the neck after the bind-off.
=(neck width in sts-neck bind-off)/2
Neck Decrease Rate
For this type of neck, I try to place my decreases over the bottom two thirds of the neck depth and then work straight for the remainder of the neck.
Just as I showed you for the armhole decreases, my process for working out the neck decrease rate is trial and error. I start with some initial numbers but adjust them until they work with the desired number of stitches and rows. Please refer to those armhole steps to help you calculate your neck shaping.
Shoulder Shaping
I often use short row shaping for my shoulder seams, but this method also works when planning stepped shoulder bind-offs if you prefer to use those.
It is easy to work out the number of stitches you should have across each shoulder once you have finalised your neck width. To calculate this, subtract the neck width in stitches from the shoulder to shoulder in stitches, then divide it by two to get the shoulder width in stitches. This is the formula for your spreadsheet:
=(shoulder to shoulder in sts-neck width in sts)/2
You will also need to find out the shoulder drop in rows. To do this, just multiply the shoulder drop from your finished garment measurements by the row gauge and round to the nearest even number. Use this formula and drag it across all sizes:
=MROUND(shoulder drop*row gauge,2)
Shoulder Segments
Your shoulder shaping can be split into segments, whether you are using short rows or bind-offs. It takes 2 rows to work a segment, so to find out how many segments we will need, just divide the number of rows in the shoulder drop by 2.
Some sizes will have the same number of stitches in each shoulder segment, whilst others will have differing numbers. To plan the number of stitches per segment, I go back to my trusty trial and error method again!
I start by dividing the number of stitches in the shoulder width by the number of shoulder segments to get an approximate number of stitches per segment. Then, fill out all of the shoulder segments with that number rounded down to the nearest whole number.
To check if those numbers work, use the following formula:
=SUM(first seg:last seg)=shoulder width in sts
If it gives a result of TRUE, your shoulder segments are correct. If it reads FALSE, you need to tweak the numbers in your segments.
To tweak the numbers, start by adding one to the number in segment one and checking to see if it changes to TRUE. If it doesn’t, add one to segment two. Again, if it still doesn’t read TRUE, repeat the process in each segment until it finally says TRUE.
Calculating stitch/row counts with a spreadsheet
And that is pretty much how it works!
Whilst I couldn’t go into the details of every single construction or style in this blog post, I hope that following along with my example has shown you just how simple it is to calculate stitch and row counts for multiple sizes. Using these numbers, you can start writing your knitting pattern!
A Grading Spreadsheet Will Never Replace a Tech Editor
As soon as I discovered that you could use a spreadsheet to grade knitting patterns, I thought all my grading woes were over - and in some ways they were. BUT, the spreadsheet is simply the foundation upon which you build your knitting pattern. It will never replace a tech editor.
Once you have “completed” your spreadsheet, you will likely need to go back to it several times to adjust and correct formulas throughout the pattern writing process. You or your tech editor will inevitably find parts of your pattern where the numbers don’t work. This is totally normal - just go back to the spreadsheet, figure out where it went wrong and make adjustments to the numbers.
Questions
It is difficult for me to cover everything about grading and using spreadsheets to develop your knitting pattern in one blog post, so I know that some of you might still have questions.
Which part of this process do you find most difficult to understand?
Let me know in the comments and I will consider writing a more in-depth post about that topic in the future.