Common Fit Issues and How to Avoid Them in Your Knitting Pattern Designs
Fit wasn’t something I was particularly interested in until I started working at a bespoke tailors.
My job was to measure customers up for their suits and pin any alterations that needed to be made whilst the suit was in-progress. Measuring each customer, I started to notice the ways in which each body is unique. Someone might have the same measurements as another client but need a very different suit due to their posture.
I learned so much about the ways that clothing can be adjusted to fit your body better. I saw people who’d struggled to find a well-fitting suit for their whole adult lives walk out of the shop with a suit that made them feel amazing. What a privilege!
Achieving Good Fit as a Knitting Pattern Designer
As a knitting pattern designer, delivering good fit for our customers can be really challenging because we’re not providing a bespoke experience. We’re catering to the “average” bodies in our size charts.
The maker might match the chest measurement from our size chart but have a completely different height and waist measurement. Whilst we can point our customers towards resources that will help them to make the necessary pattern adjustments, it’s up to the maker to perfect the fit to their own unique body.
What we can do, however, is make our patterns fit the “average” body from our size charts really well, so that those who do need to adjust the pattern have an excellent foundation to start from.
How to Check the Fit of Your Knitting Patterns
During the design process, there are two opportunities when you can test the fit of your knitting pattern.
Finished Sample
When you have finished the sample, you or the person who is going to be modelling your sweater should try it on to assess the fit. Take note of any possible problem areas and check them against the size chart and schematic.
If it is clear that you’ve made a mistake, you can start adjusting the pattern right away before moving onto the next step of the design process.
If the garment meets the expectations of the size chart and schematic, the fit issue that you’re seeing might not be a universal fit issue. It might just be that the garment doesn’t fit the model very well. In this case, you can move on to the next stage and check the fit during test knitting.
Test Knitting
I’ll talk about test knitting in much more depth in a future blog post, but for now, I’ll say that you should always try to get two test knitters per size. Ask for their feedback on the fit of their finished garments. If you notice that the same fit issue keeps coming up, it is a big red flag that you need to adjust the fit before you take the pattern any further.
Fit Issues and How to Solve Them
Sweater Falls Off the Shoulders
This issue is often emphasised in drop-shoulder sweaters because they drag the sweater even further off your shoulders! It is also very common in deep V-necks or open-front cardigans. This problem suggests that the neckline is too wide.
If you’re having this problem, make the neckline narrower. If the garment is an open-front cardigan or it has a deep V-neck, the neck width should be 30-40% of your cross back width or no more than 18 cm (7 in) wide.
Shoulder Seams Extend Over Shoulders
If the shoulder seams of a set-in sleeve sweater extend past the tip of the shoulders, the shoulder measurement is too wide. The full shoulder width of your garment should match the exact cross back width taken on the body without any additional ease.
To remove any extra width, you can just make the shoulder seams shorter. If your neckline is looking a little wide, you could remove the additional width from the neck width instead and keep the shoulder seam widths the same.

The neck bump can appear beneath the front or the back neck.
Bump Beneath the Neck
This problem is common with roll-neck sweaters. If the neck has a roll or bump of fabric beneath the neck, it suggests that the neck is too high.
If the bump is at the front, make the front neck deeper. If it is at the back, make the back neck deeper.
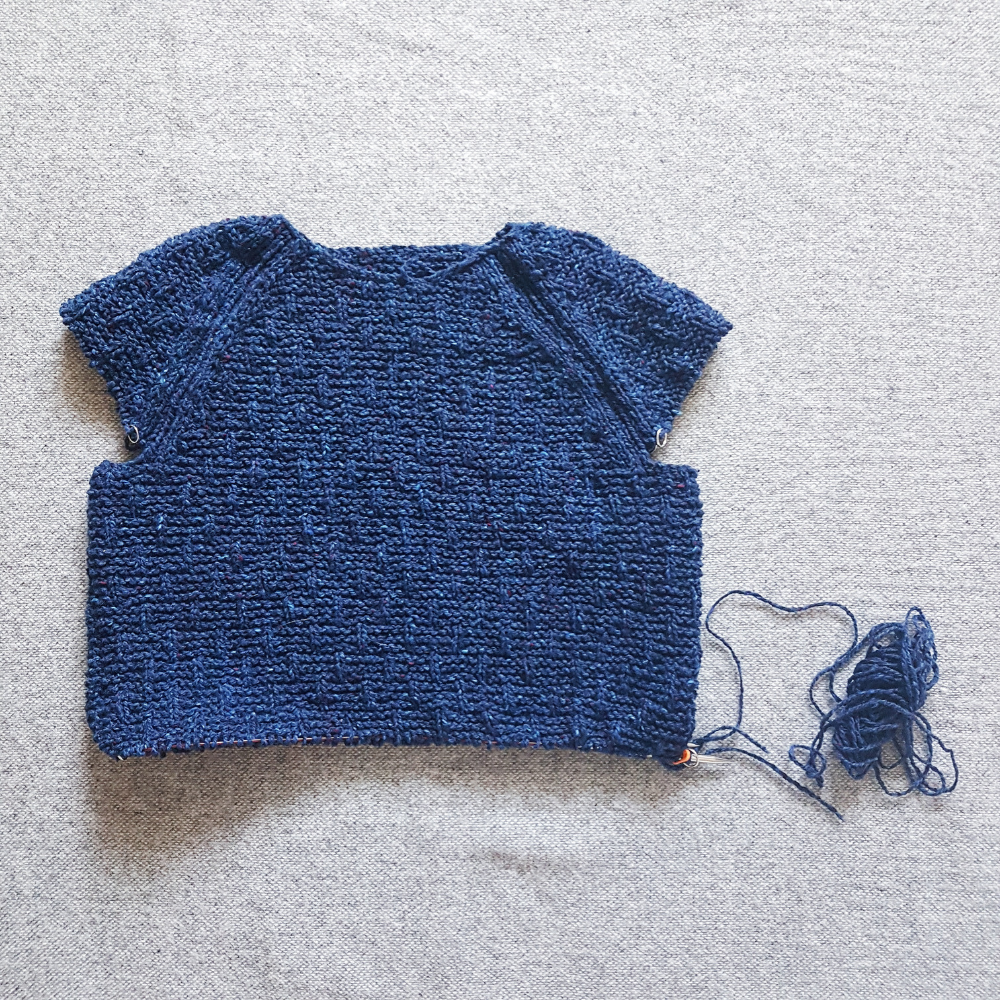
Raglans Have “Wings” Under the Arms
If there are excessive folds of fabric under the arms of your raglan, it could be one of two things. Either the bust circumference is too large (the more common issue) or the armholes are too deep.
If there is a lot of excess fabric over the bust, the bust circumference needs to be reduced. If the armholes look like they are too deep, you will need to shorten them and adjust the rate of shaping in order to meet the original stitch counts in less rows.

The raglan lines are dragged so far towards the arms that the line looks almost vertical rather than diagonal.
Raglan is Dragged Towards Arm
If the raglan line looks like it is being dragged towards the upper arm, it is likely because there isn’t enough room given in the upper arm. This is often paired with the chest being a little too big. It’s almost like the overall circumference around the upper arms and body is correct, but the allocation for that measurement is unbalanced.
If there isn’t enough room in the upper arm, widen it. If necessary, remove the same amount from the chest and upper back so that the overall circumference around the upper arms and body remains the same.
Side Note on Raglans
So many raglan issues are caused by designers believing that the rate of the armhole shaping has to match on the sleeves and body. I might sound unconventional, but this is not true!
As long as you work the decreases over the same number of rows, you can have completely different rates of shaping. This enables you to achieve the fit you want across both the body and sleeves, without compromise.
Armhole Feels Uncomfortably Close
If the armhole feels like it’s digging in at the underarm, it needs more depth. At least 2.5 cm (1 in) of ease should be added to the body’s armhole depth to create the garment’s armhole depth. 5 cm (2 in) is plenty.
Cardigan Fronts are Swinging Forward or Towards the Sides
The front bands of a classic cardigan should be parallel to one another.
If they are both swinging towards the centre-front, it can suggest that there isn’t enough room in the bust or your shoulder drop is too deep. You can try increasing the bust measurement or you can make the shoulder drop less deep.
If the front bands are swinging to the sides, you can try deepening the shoulder drop to lift the front bands and bring them parallel.
Hem Isn’t Parallel to the Ground
If the front of your sweater is higher than the back, it suggests that there isn’t enough room in the front of the sweater. The best way to add length to the front whilst keeping the back the same is by using bust darts.
This isn’t common practice when designing knitting patterns (it’s normally done as a pattern adjustment by makers) but Jacqueline Cieslak offers this as an option in her Rift Tee and I think it’s an awesome idea!
Discussion
What fit issues have you struggled to resolve when designing knitting patterns? Share them in the comments section below and I’ll tackle them in a future blog post.